The Leaf Hair Blog

5 Hair Salon Recruitment Tips to Hire Experienced Stylists
Hair salon recruitment is a huge issue for businesses in the UK right now as there is a shortage of hair stylists. Whilst demand for hairdressers is high, there are simply not enough stylists ready to be hired. Therefore, finding the right quality and calibre of stylists in your area has never been more difficult. Every hair stylist that you employ in your salon is a direct reflection of your business’ standard, so finding the right people to bring to your team is vital to making you stand out, and will ensure your salon’s success. How to recruit experienced hair stylists With that in mind, here’s how to recruit experienced hair stylists who are the perfect fit for your hair salon. Consider where and how you advertise When looking for stylists or candidates with hairdressing backgrounds, it is worth looking on specialist job boards like Hairdressing Journal and EG Recruit, or alternatively, utilise specialist recruiters in the industry. Job boards such as Indeed are especially valuable for finding support staff, assistants, apprentices and receptionists, however, you can also use this service for your more experience-demanding roles. That being said, you can also use your own resources to advertise vacancies. By displaying job roles on your website, you will be sure to attract people who are already interested in working for your particular salon. These people are more likely to be passionate about your brand. Additionally, make use of your salon window or email newsletters. 2. Use social media to your advantage When it comes to using social media for recruitment, both paid ads and organic posts are going to be important. With paid social ads, you can spend as little as £50 to advertise a post on social media, allowing you to target a wider range of potential candidates in your local area. Paid social advertising is especially effective, as you can choose audiences who you know will be interested in applying, meaning your budget for recruitment will be spent efficiently. For example, target people with an interest in hairdressing or products you use or are affiliated with. You also have the ability to post directly to your social media profiles, and the best part about this is that it’s completely free. This could simply be a captivating post that talks about a role you’re hiring for. Our top tip is to encourage your followers to tag or share with someone who they think might be interested. 3. Recruit internally using a referral scheme Hair stylists are renowned for their social skills; they’ll have done a lot of networking in previous roles and also talk to numerous people on a day-to-day basis. Therefore, it’s always worth asking your existing team if they can recommend anyone for the role. This is an excellent way to recruit as your employees know the work environment well and will be able to assess if someone would be suitable. This can simply be a conversation with your staff, or you can add an incentive for them to find a new team member using a referral scheme. For example, if a staff member recommends someone for the role, then they will receive a monetary reward once that person has been hired and passed the probation period. This method can really propel your recruitment process. Overall, internal recruitment means you’re more likely to bring in like-minded people that your team can get on with, and will fit in well with the business and team as a whole. 4. Focus on your interview and trade test process It is integral to ensure you give your interview process the care and the attention it deserves. Don’t try to squeeze in an interview in between clients, book time out of your diary to ensure you are making the right decision. After all, you’ll want to utilise all the time you can get to really get to know the person you’re potentially hiring. Use the interview to gain insight into what the candidate is like as a person. Ask open questions to get them talking. Try to stray away from generic interview questions and ask things that truly matter to you. It is also important to use this time to tell them about the salon and answer any questions that they may have. For the trade test, you have to be mindful that there is a shortage of stylists and there are groups in the UK not doing trade tests anymore. On the other hand, there have been instances of salons asking for 10 models. If you do not feel that a trade test is necessary, you might want to request a portfolio instead. With that in mind, here are our recommendations for executing successful trade tests: Job Role Trade Test Recommendation Hair Stylist (Cuts only) 1 model consisting of a haircut with graduation 1 long layered haircut with styling 1 Gent’s Scissor over comb Hair Colourist 1 Global tint application (must show an even application of permanent colour from roots to ends) 1 Half head highlights / Balayage 1 creative colour Hair Stylist & Colourist 1 Global application with graduation haircut 1 Half head highlights with long layered cut 1 Gent’s Scissor over comb 5. Make an offer fast On the one hand, it is important to carefully consider which candidate is right for the job. Though you can rush a decision and get someone hired quickly, you may have to pay the price later when you realise they are not right for the role. On the other hand, time is precious during recruitment. Your candidates will surely be applying to numerous roles, so if you feel you have the right person it is crucial to get back to them quickly. In fact, salons that offer the job first are normally the businesses that get the person on board. When it comes to responding to unsuccessful candidates, it is always worth giving them some constructive feedback. This will help them with their job search, however, they will be more likely to remember your salon and apply for roles in the future. Ask to keep candidates' details if you feel they might be suitable in the future. Use LEAF Academy for more industry insights We understand that the hair industry is fast-paced and constantly changing, which is why the LEAF Academy is your go-to way to keep up to date. Here, you’ll find industry insights including how to be more sustainable, hair salon business advice and even expert cutting tutorials.
Learn more
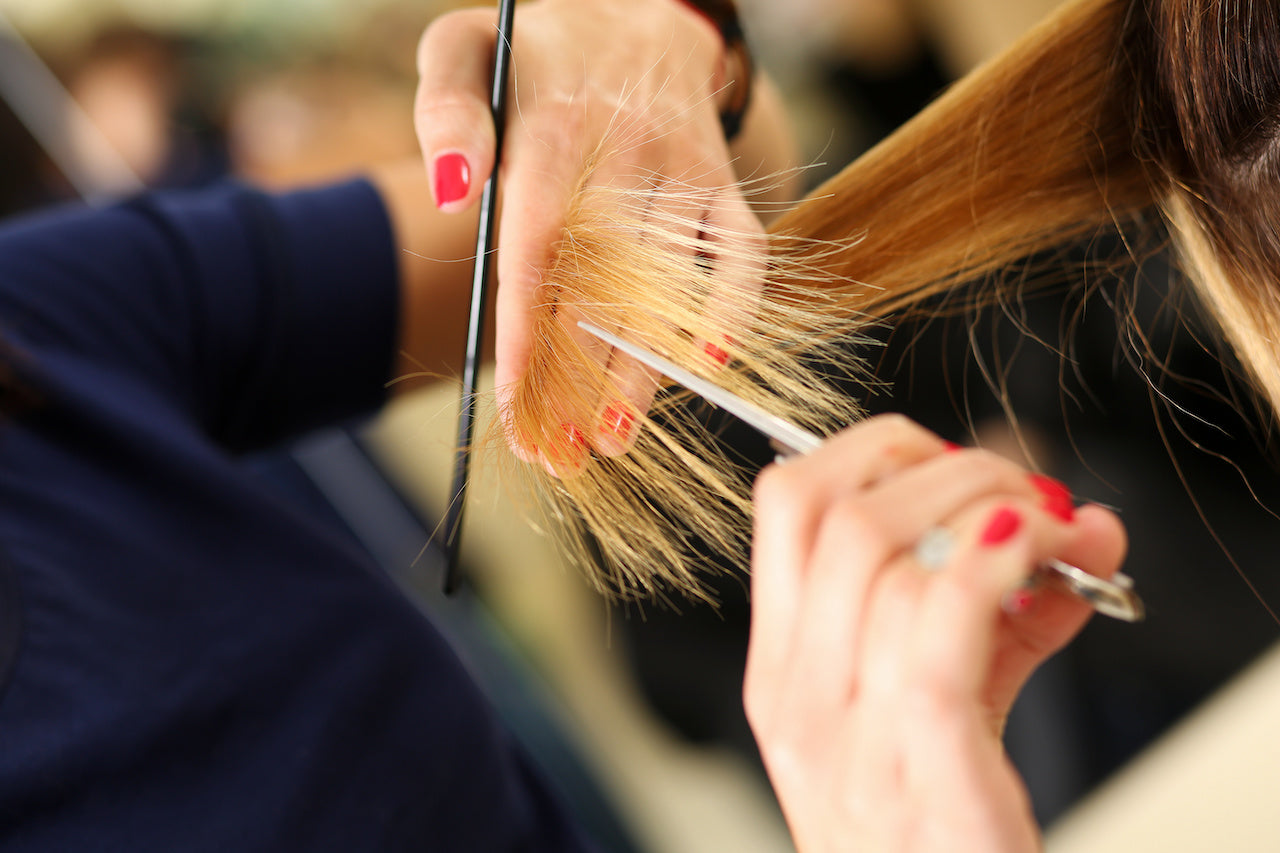
How To Do The Slicing Hair Cutting Technique for Professionals
Taking the time to explore new hair cutting techniques should be on every hairdresser’s or barber’s to-do list. It can elevate your cuts to have a variety of skills in the bag, and what better way to start than to learn how to slice cut? So, what is slice cutting hair and how do you slice hair? We’ve covered everything you need to know about slice cutting below. What is slice cutting hair? Put simply, slice cutting is a quick hair cutting technique that allows you to break up solid shapes and remove weight from the hair. It adds volume, texture and movement without compromising the length of the hair. This is not to be confused with ‘slicing’ which is also used in hair colouring to section hair for foils. Which clients should you use hair slicing on? We recommend avoiding clients with fine hair. Usually, you’ll use this technique on those with medium to thick hair to remove density, as those with fine hair will want to keep as much thickness as possible. However, the only time you could use slicing on a client with fine hair would be to add layers. These layers should be short in order to create a thicker appearance, rather than remove weight. How to slice hair: Cutting technique explained 1. Decide whether to work on wet or dry hair Before you even begin, decide whether it will be more suitable to work on wet or dry hair. To aid your decision, look at the thickness of the client’s hair. Wet hair makes it easier to take off lots of hair, so this is a good option for thicker haired clients who want to remove weight. 2. Section hair based on desired results Sectioning correctly can really elevate the final results. Generally, you’ll simply pick up vertical sections of hair for this technique. However, you can change this up slightly based on the desired finish. For example, try taking square, zig zagged sections to create beautiful layers. 3. Bring the hair up horizontally Once you have your sections, slicing is really all about the angles. Bring the hair up horizontally and allow the ends to fall with gravity. With open scissors, position the blade a few inches from the ends of the hair. The further up your scissors start from the ends, the longer the layers will be and the more hair you will remove. 4. Flick the wrist upwards You’re all set for your first slice, so now you’ll want to flick the wrist in an upwards motion along the strand of hair. Move along the ends of the section, making sure that each strand is even. Keep in mind that the more slices you do on each strand, the more hair will be removed. 5. Drop sections and work around the head Once you have worked all the way along your first section, you can drop the hair and move onto the next. Dropping the section allows you to pick it up again if you need to, and also means you can pick up a little bit of the old section along with your new one to act as a guide. Which scissors should you use for slicing? When choosing scissors for hair slicing, it really depends on your desired result. If you want more precise slices with more texture, shorter scissor lengths will be ideal. We might sound biased, but LEAF Scissors really are an incredible option for so many different hair cutting techniques. They come in a variety of lengths and are handmade from Japanese steel to ensure high quality cuts every time. Additionally, if you’ve tried slicing and it’s not for you, you can achieve similar results with texturising scissors. Read our previous blog here to find out everything you need to know to master this technique. Learn more cutting techniques with LEAF Academy Whether you want to learn how to use a new tool, master a cutting technique or learn the ins and outs of a new haircut, LEAF Academy has an array of video tutorials made by industry-leading experts.
Learn more
How to Be the Best Hairdresser: Interview with Charlie Gray
Wondering how to be a good hairdresser? We sat down with Charlie Gray, founder of Hair In Motion, to get some insightful tips on how to be the best in the industry. Here’s what we learned. Are there any skills and qualities for hairdressing that are important to have? Patience One of the most integral qualities in hairdressing is patience. It is very easy to get frustrated with the level you’re currently working at, but it is important to remember that learning any creative craft takes time. Indulge in your learning and you’ll see major improvements in your skill, but don’t expect to see huge progress overnight. Confidence Another vital skill to build is having a sense of composure and self-confidence. Whilst working in hairdressing, especially in a salon or barbershop setting, you might begin comparing yourself to others. It is easy to let yourself gravitate towards this kind of mindset, which will only negatively affect your work. “You need to develop strong confidence in your own ability. Focus on your own vision and goals, and really discipline yourself so that you’re not constantly comparing yourself to others.” Courage It’s easier said than done. But be courageous every once in a while. Hairdressing is an avenue of exploration; you should define your own goals, stick to your strengths and find out what you truly enjoy. Once you’ve found your passion don’t hesitate to take the necessary (bold) steps to make it happen. What kind of customer service skills in hairdressing should you strive to develop? Hairdressers are very much people-orientated. You’ll often hear the joke that we are also therapists, which isn’t far from the truth. We’re very relaxed and open-minded people, which are qualities that naturally improve your customer service skills. Generally, you’ll want to be approachable and easy-going. Clients can really open up to you during an appointment, and you should be able to reflect this openness back to them. Of course, we’re talking more about personal qualities here, but learning people skills will come naturally with practice. What advice would you give to those just starting out their career? The main skill you’ll really want to drill down into in the beginning is developing a strong willingness to learn. “Become a sponge: make it your mission to use everything as a learning opportunity. Observe and take in everything around you and don’t be afraid to get really stuck into what you do.” Your job needs patience but also dedication. You need to invest a lot of your time to learn such a meticulous craft. You’ll likely need to make sacrifices if you want to exceed people’s expectations. A key thing to bear in mind before throwing yourself into hairdressing is that you likely won’t make a lot of money in the beginning. It’s a common misconception that hairdressing is easy and that you’ll rake it in from the get-go. This is simply not the case, and, just like with any job, you’ll need to work your way up. “But most importantly, take advantage of the freedom you have to express yourself creatively.” Being a successful hairdresser: How can you improve hairdressing skills? First and foremost, you’ll want to crack down on your fundamental knowledge from the very start. Learn techniques, get experience and take opportunities to be creative and explore, as this is the most effective way to learn. The best way to do this is to work with a good academy. Many of the bigger salons in the industry provide fantastic training opportunities. Once you know your techniques you can move into exploring your skills more creatively at niche independent salons. If you really want to improve your skills, then start prioritising knowledge over money. You’ll start finding that when you do this, you’ll have more opportunities to learn and do what’s best for you. Money can always be earned, but knowledge and skill are priceless in this industry. “For me personally, I spent around 5 years of my career building my knowledge. Once I had this, I was able to pursue bigger things, like learning to teach others and how to run a business. Your journey in this industry simply shouldn’t stop at cutting hair.” What do you love about the profession? One of the biggest advantages of being a hairdresser is the opportunities it brings. “For me, I’ve been able to meet incredible people and travel to amazing places which I probably wouldn’t have gone to without pursuing this career. Everything I do now, I owe to hair.” What is the best advice you’ve ever received? Trust your gut instincts! If something doesn’t feel right for whatever reason, learn to take risks to change for the better. If you’re never willing to take risks, then you won’t know what kind of decisions will backfire, and equally, you’ll miss out on great learning opportunities. So, trust your gut and learn to take risks. What is an insight that you wish everyone in the industry knew about? “It’s not how long you’ve been in the craft, it’s the dedication you’ve put into it.” The majority of people lack the mindset to become the best at what they’re doing. This just goes to show that having a winners mindset is so much more important than skill set. In fact, a hairdresser who has 1 year of experience can easily be a better hairdresser than someone with 30 years of experience. This just comes down to that mindset of being willing to learn and improve. If you stop developing your skills and striving for success, you’re always going to be stuck in the same place. Start growing and developing in your hairdressing career Did you find Charlie’s insights useful? His platform, Hair In Motion, has released a 10-week Mentorship Programme for individuals who want to push the boundaries in their teaching career. Find out more here. Or, keen to build on your fundamental skills? The LEAF Academy offers innovative haircutting tutorials from top names in the industry, including Charlie Gray! Check out all the courses here.
Learn more
Hair Salon Ideas for Becoming an Eco-Friendly Hair Salon
With more and more salons choosing sustainable values, it is great to see positive change in the hair industry. But it can be tricky to pick the right eco-friendly changes to make in your salon. Here are some sustainable work practices in hairdressing and barbering to help.
Learn more
The Pros and Cons of Going Self Employed as a Hairdresser
Once you become a qualified hairdresser, the world is your oyster. But it can be difficult to really know what you want to do, and that’s okay! We’re giving you a deep dive into two options: going self-employed or working in a salon. What is a Freelance Hairstylist and How Does it Differ From Working in a Salon? A freelance hairdresser is typically self-employed and works independently with their own client base. They might have a location where they work, or they can be mobile and visit their clients’ homes. On the other hand, working in a salon would mean you are employed by someone else, whether that be by a small independent salon or a big chain. The Pros of Becoming a Self Employed Hairdresser Firstly, you choose your own hours and location. This makes your work very flexible, as you can work on your own accord and choose any location that suits you. You can also pick the products you love and use them, rather than being restricted by a certain product brand at a salon. With hard work, your income can be improved as you are free to set your own prices. Some people feel very accomplished and successful by working for themselves, as you have earned your success and income off your own back. Finally, you can choose how to educate yourself and have the freedom to choose courses. The Pros of Working for a Salon In a salon setting, you are part of a team which means you can have support from others and can constantly learn from people around you. There is a sense of collective ambition which you can’t achieve on your own. You also receive assistance from the salon’s marketing to grow your client base. Usually, a salon will invest a lot of money into marketing, so you might be able to gain clients at a faster rate than if you were a freelancer. Often salons will provide educational opportunities which are sourced for you, and there are also career growth opportunities, for example, working in management or specialising in a service. In terms of income and expenses, there is a lot more financial security as you have a clear and consistent pay packet every month. Additionally, you won’t be spending your income on supplies, as all tools and products are provided by the salon. The Cons of Being a Freelance Hair Stylist Working on your own might be fulfilling, but at times you might feel lonely or miss the team dynamic of working in a salon. But don’t forget, you’ll still have all those lovely social interactions with your clients! You also have to seek education opportunities yourself. It can sometimes be hard to know which areas you need to improve without an outside perspective, so it can be difficult to stay motivated to improve. Lots of people don’t consider the administrative work that you have to do on your own, including accounting and taxing, as well as your own marketing to grow your client base. This could mean you are constantly in work mode and do long hours. The Cons of Working for a Salon At the salon, there is not much flexibility in terms of hours and the products you use in the salon. This might lead you to feel quite restricted by your job. For some, you might feel like there is a ceiling on their career, as you might feel more limited as you’re not working for yourself. Additionally, people often forget that your client base is not your own, and they technically belong to the salon you work for. Contrary to being self-employed, a % of your earnings are retained by the salon. Again, this might make you feel like you are not earning your full potential. Should You Choose to Go Freelance or Work for a Salon? There is no right or wrong answer, as some people thoroughly enjoy working for a salon, whereas others might want to work for themselves. Either career path can make you feel just as successful, the most important thing is that you are happy and love what you do! But generally, we’d recommend that you really take your time deciding what the best path is for you. There is no rush when it comes to hairdressing, so figure out what you enjoy and what you want to accomplish before making any rash decisions. Develop Valuable Skills for Any Career There's no doubt that you'll need to develop exceptional skills, no matter what career path you take. Why not check out our LEAF Academy? Here, you'll learn from the best in the industry. Learn more about LEAF Academy here.
Learn more
Hairdressing Career Advice From LEAF's Founder: Stephen McManus
We are excited to share with you an interview with LEAF Scissors’ founder, Stephen McManus. Keep on reading to get tips for hairdressers to help you excel in your career. If you’re looking for hands-on video tutorials to improve your technical skills head over to the LEAF academy to get access to our classes. Starting From Zero - How Do You Become A Hairdresser? Being a hairdresser is a technical job and needs an involved level of education, so it’s harder than most people think. To become qualified, you’ll take an NVQ Level 2 or 3. There are two main routes that you can consider taking to complete this: Hairdressing at College College will feel a little bit more like school and less like work. You’ll learn the theory in a formal environment. But you won’t totally miss out on the practice. As well as working on real clients, you should also have the opportunity to get work experience. Overall, this route is for those who want to stick to a school environment. And we understand: It can be daunting going straight into the working world. Hairdressing Apprenticeships An apprenticeship will give you more insight into the day to day at work. Steve believes that doing an apprenticeship is the best route you can take to become a qualified hairdresser. Whilst you are still exposed to lots of theory, you also gain the customer and team experience which is crucial. This will give you a much more in-depth skill set than college will. Remember, a great hairdresser has hard and soft skills. “Take your time and really get a feel for what you want to do.” What Are The Different Career Options in Hairdressing? One of the amazing things about becoming a qualified hairdresser is that there is a multitude of career options out there. The obvious choice is to become a hairstylist and work in a salon, but even with that, there are so many possibilities. You can choose to specialise in cutting, colours or both and learn to build a client base. You can branch into management or even own your own salon. Is salon work not for you? There is creative or editorial work, as well as jobs in film and TV. A big industry where you’ll also find an abundance of options is the fashion industry, or you could even become a celebrity stylist. How To Gain Exposure As A Hairstylist Gaining exposure as a stylist has never been easier. Before, the best opportunities were in big cities such as London, Paris and New York, but the internet has brought a spectrum of opportunity. The hair industry is up for grabs for all. Social media is your ticket to success; you can upload your best work to create a public portfolio, and network with stylists globally. Your work could fall into the laps of anyone, so it is well worth having an online presence. What Is The Best Way to Set Up Your Own Salon? Start with an apprenticeship to build the relevant skills. Gain real work experience for 2-3 years, preferably getting into a management role. Take the time to decide to open a salon - you’ve got to really want it. Find your USP (unique selling point), what do you care about and how will you make a difference? Choose a great location. Consider your branding - what’s your business’ style/personality? Apply for a loan. Spend time to hire the right people. Ensure you invest in marketing. Curious to learn more about setting up your own salon? Keep your eyes peeled for a course we’re working on. The Advantages of Being a Hairdresser - What Do You Love About The Profession? “I believe the hairdressing industry is unparalleled to any other industry. It is filled with unique, creative, passionate people with a willingness to wear their heart on their sleeve. The energy created by these people is outstanding. They are very caring and giving and genuinely care about their clients, and boosting people’s self-esteem. I couldn’t be more proud as an industry”. What Is The Best Tip You’ve Ever Gotten? “Education is more than teaching someone how to cut hair, you’ll give them a skill set that will provide for them for the rest of their lives”. There is a direct correlation between the education you provide and how successful they will be in life, so you should appreciate the opportunity you have to teach someone. What’s a Tip for Hairdressers That You Wish Everyone Knew About? “Never stop learning, you’ll never know everything and if you think you do then something has gone wrong. Education is what leads to growth.” Steve’s top hairdressing tip is to write down one thing you have learned every single day. After a year, you’ll have a collection of learnings, whether big or small, to commemorate your hard work and dedication to your career. Learn Even More with LEAF Exciting changes are happening at LEAF, and we’re pleased to be bringing you educational content for hairdressers and barbers. From industry insights to cutting tutorials, we’re releasing an abundance of resources to help you be the best that you can be. Sign up to the LEAF Academy to get access to expert hairdressing tutorials.
Learn more
Top Tips for Left-Handed Hair Stylists
When becoming a hairdresser or barber, being left-handed might feel like a bit of a curse. However, with the right tools and training, it can turn out to be the ultimate gift and the perfect source of inspiration.
Learn more
Complementing Your Scissors: 5 Essential Tools for Hairdressers
There is so much more to great hairdressing than the scissors. Here are some essential hair tools that all hairdressers should have!
Learn more
The Ultimate Hair Cutting Techniques Guide
Learning to cut hair is a continuous process - there are always new methods to try. But understanding the fundamentals is key to progressing onto expert techniques. Here are all the steps you should follow to create flawless haircuts. If you’re keen to get into the details download our free PDF guide. Understanding Shape and Form When Cutting Hair As hairstylists, your geometry lessons from school are extremely useful when learning to cut hair. Geometric shapes such as squares, triangles and circles should all be used when creating a cut. Typically one haircut is made up of a variety of smaller shapes, but they all come together to form one primary shape. By learning to cut using geometric shapes, your haircuts will have a strong outline and a flawless, defined shape. How to Part Hair for Cutting It is also important to part the hair when cutting as it is one of the biggest factors that changes the shape of the haircut. It also allows you to be thorough and precise when creating a haircut. There are many different patterns of partings, but the method you use will all depend on the haircut you are trying to achieve, and how you want the hair to move. In general, to get a clean section every time, take a fine-toothed or parting comb. Take both forefingers and place them on the tip of the tooth, placing your palm on the hair. Glide the comb, putting pressure on the tip, through the hair. You will then have a perfect, clean section to work with. Distribution in Hair Cutting You have your sections, but now you need to think about how you comb the hair in relation to the sections you have created. This is what we call distribution. You must consider the following when using distribution: Weight distribution of the haircut. Whether the line will be cut strong or soft. Whether the cut will move in the desired direction. Elevation in Hair Cutting Elevation is the way you lift the hair away from the head before making a cut. Elevation changes the silhouette of the haircut, by removing more or less weight from the perimeter of the cut. It is usually referred to in angles, such as 45° or 95°. What Are The Different Cutting Techniques? Now that you have prepared the hair for the cut, you can get your scissors ready. But there are many different techniques to consider, and again, each will have a huge impact on the final result of your creation. Blunt Hair Cutting Technique This technique is great for adding definition to the hair by creating a solid, sharp line. It is great for thicker hair as it adds focus to the fullness of the hair. Make sure your sections are thin, as thick sections will cause a lack of definition. Get your client to tilt their head forwards, and comb the hair downwards. Holding the comb just above where you want the length to sit, take your scissors parallel to the comb and cut a straight line. Point Cutting Hair Technique Point cutting softens the line of the cut, so you can avoid the harsh lines which we created with the blunt cutting technique. It is a very simple technique; first, cut a straight, dominant line. Hold the hair between your fingers, and point your scissors towards the head. Cut along the dominant line without changing the position of the scissors. Razor Cutting Hair Technique Razors are a fantastic tool which should be used more often - they allow you to seamlessly remove weight and length from the hair, much more quickly than normal scissors could. As always, ensure the hair is parted and sectioned. Working on the perimeters of the hair, hold the hair in front of the second knuckle, place the blade against the hair and lightly glide it over. Want to try out this technique? Our Black Edition Razor is lightweight and comfortable in your hand, to allow you to create the perfect looks with ease. Slicing Hair Cutting Technique This technique requires you to slice the hair in it’s natural fall to create texture and encourage direction, much like the razor cutting technique. The more pressure you use with slicing, the more weight you will remove. It is also important to do it on wet hair. All you have to do is point your scissors downwards away from the scalp, and slide it down the lengths of the hair. The more times you repeat this, the more weight you will remove. Download Our Free Cutting Techniques Guide Keen to learn more? Download our PDF that includes even more cutting tips and techniques that you can learn. Keen to learn more in the long-run? With LEAF Academy, you can watch tutorials from top names in the industry. Find out more here.
Learn more